Scheduling a command in GCP using Cloud Run and Cloud Schedule
Google Cloud CLI makes it very quick and easy for engineers to get started with initial development on Google Cloud Platform and perform many common cloud tasks. The majority of the initial development experience is via the command line interface using tools like gsutil, gcloud, but getting the code to production requires writing ceremonial code or building API-level integration.
Developers often come across scenarios where they need to run simple commands in their production environment on a scheduled basis. In order to execute on this successfully, they are required to code and create schedules in an orchestration tool such as Data Fusion or Cloud Composer.
One such scenario is copying objects from one bucket to another (e.g. GCS to GCS or S3 to GCS), which is generally achieved by using gsutil. Gsutil is a Python application that is used to interact with Google Cloud Storage through the command line. It can be used to perform a wide range of functions such as bucket and object management tasks, including: creating and deleting buckets, uploading, downloading, deleting, copying and moving objects.
In this post, we will describe an elegant and efficient way to schedule commands like Gsutil using Cloud Run and Cloud Scheduler. This methodology saves time and reduces the amount of effort required for pre-work and setup in building API level integration.
You can find the complete source code for this solution within the Github.
Here’s a look at the architecture of this process:
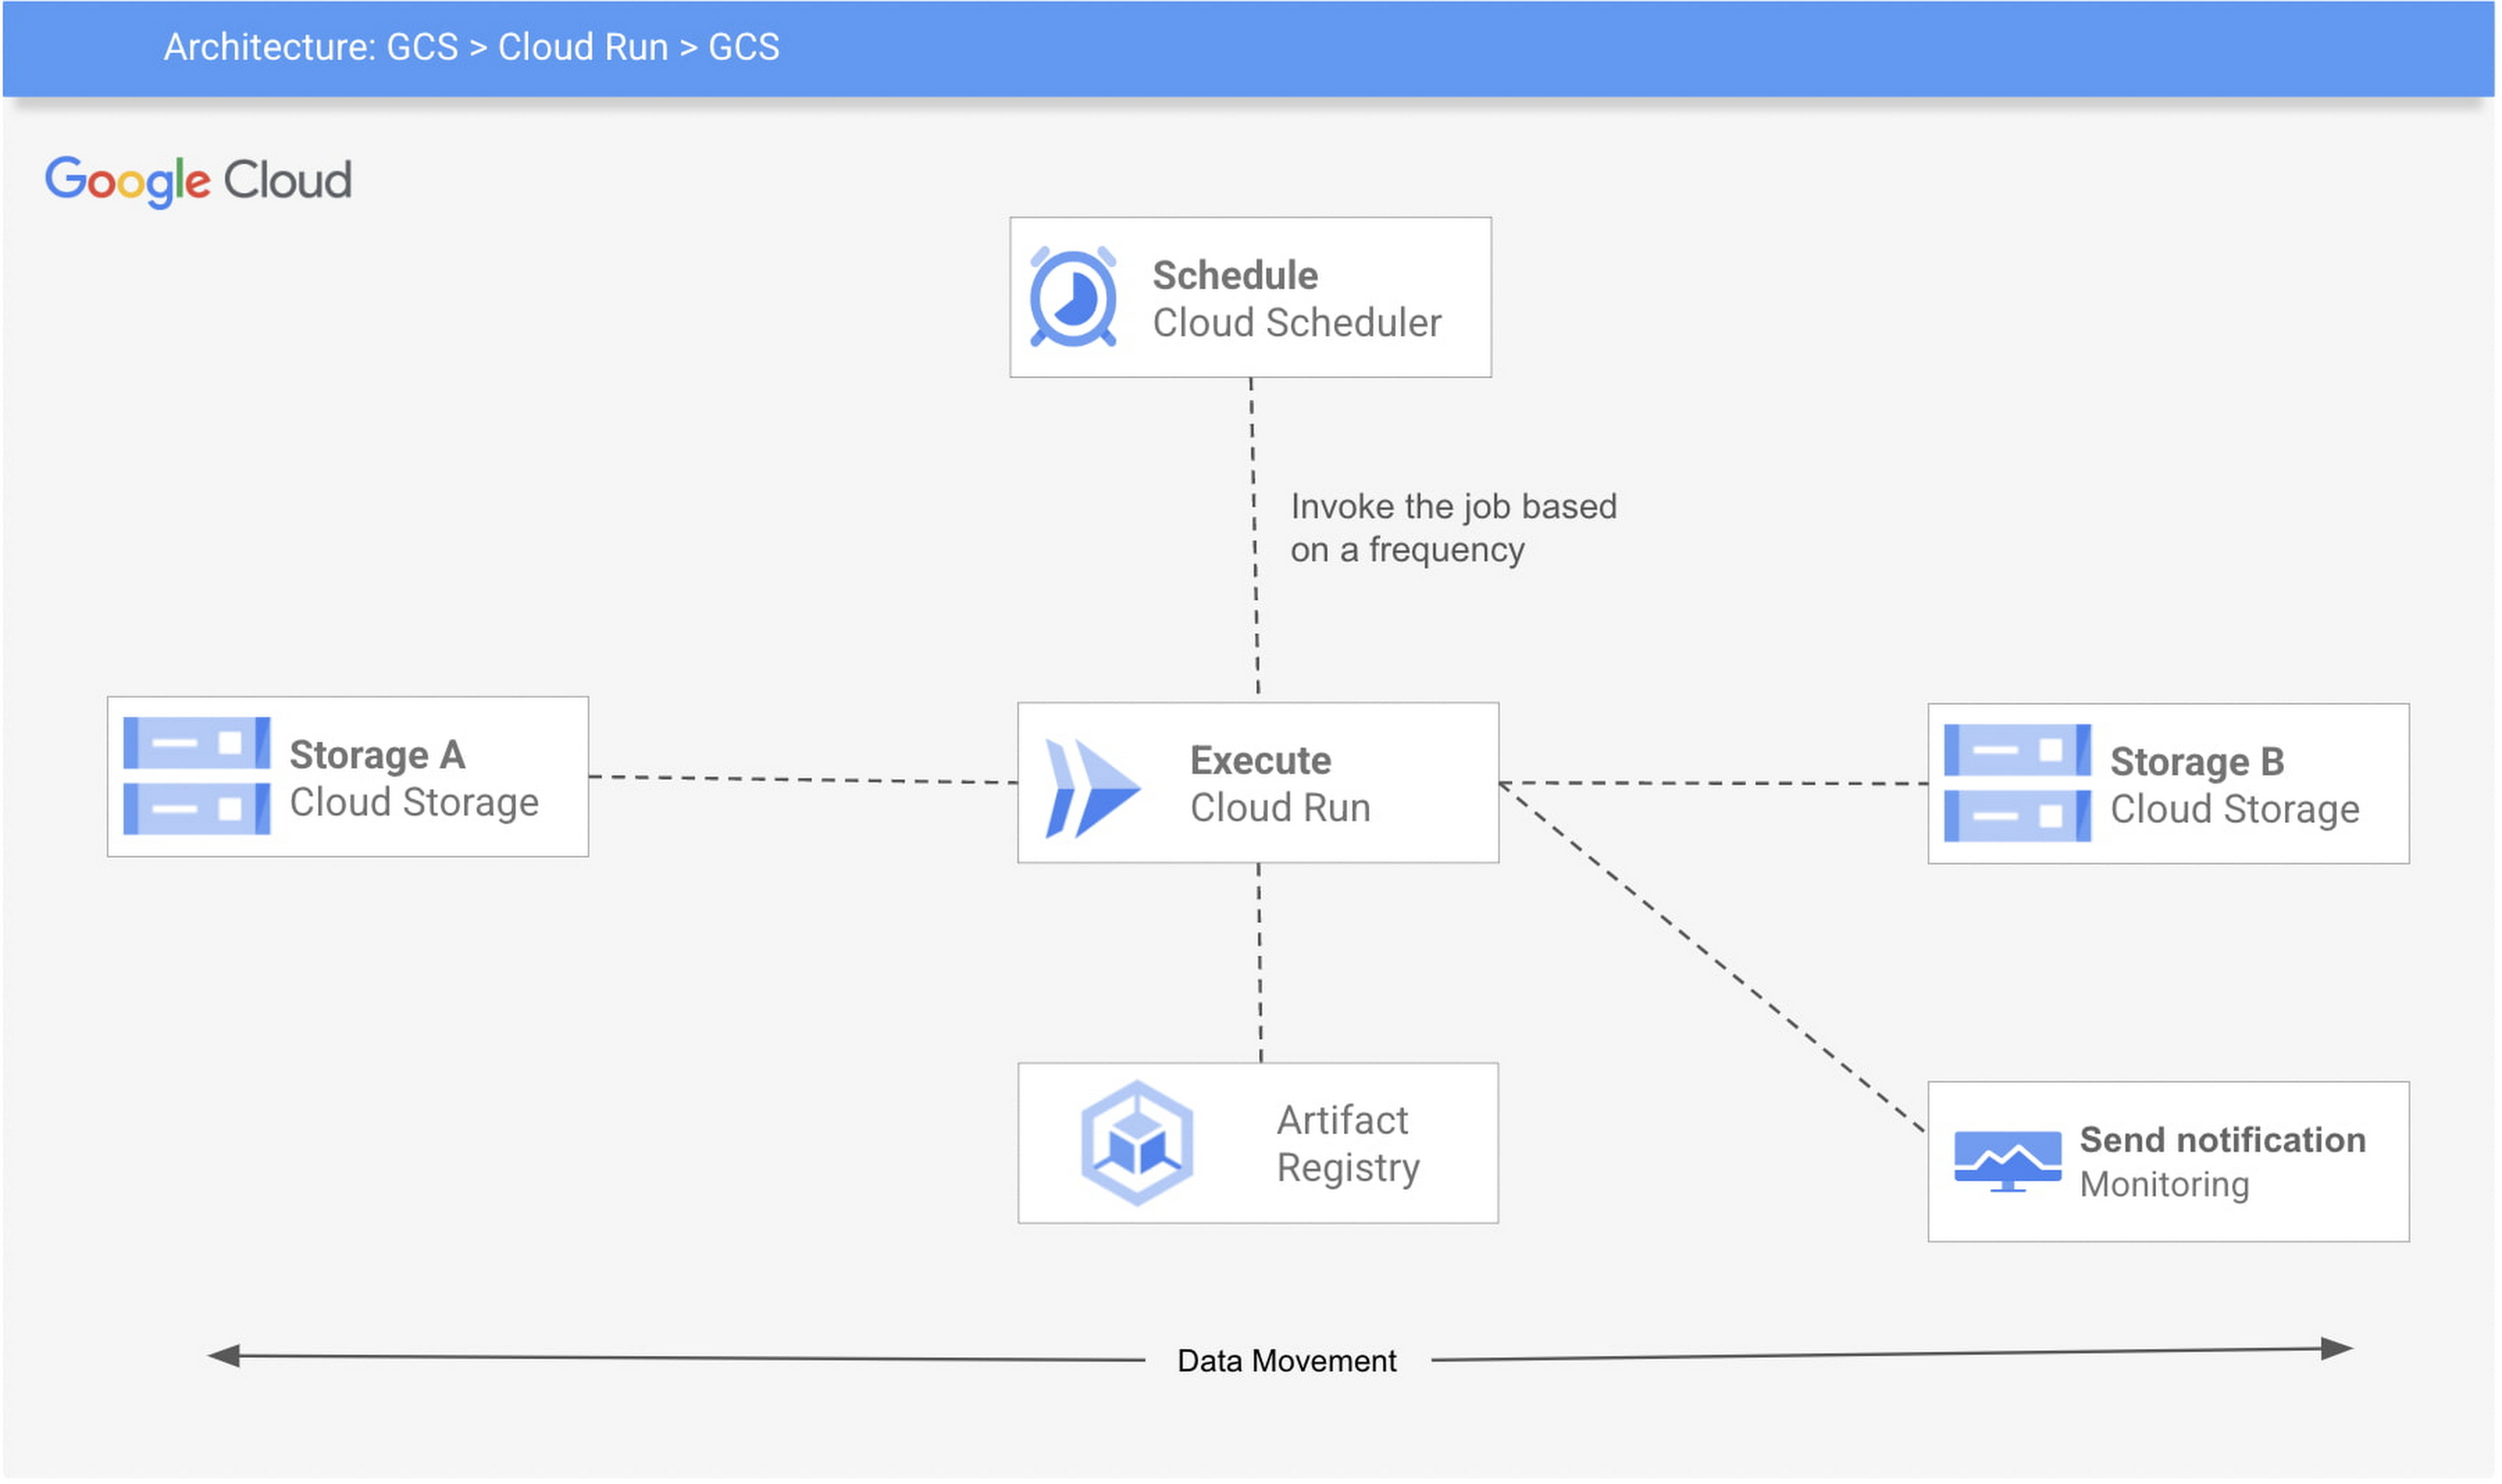
The 3 Google Cloud Platform (GCP) services used are:
- Cloud Run: The code will be wrapped in a container, gcloud SDK will be installed (or you can also use a base image with gcloud SDK already installed).
- Cloud Scheduler: A Cloud Scheduler job invokes the job created in Cloud Run on a recurring schedule or frequency.
- Cloud Storage: Google Cloud Storage (GCS) is used for storage and retrieval of any amount of data.
This example requires you to set up your environment for Cloud Run and Cloud Scheduler, create a Cloud Run job, package it into a container image, upload the container image to Container Registry, and then deploy to Cloud Run. You can also build monitoring for the job and create alerts. Follow below steps to achieve that:
Step 1: Enable services (Cloud Scheduler, Cloud Run) and create a service account
export REGION=<<Region>>export PROJECT_ID=<<project-id>>export PROJECT_NUMBER=<<project-number>>export SERVICE_ACCOUNT=cloud-run-sagcloud services enable cloudscheduler.googleapis.com run.googleapis.com cloudbuild.googleapis.com cloudscheduler.googleapis.com --project ${PROJECT_ID}gcloud iam service-accounts create ${SERVICE_ACCOUNT} \--description="Cloud run to copy cloud storage objects between buckets" \--display-name="${SERVICE_ACCOUNT}" --project ${PROJECT_ID}gcloud projects add-iam-policy-binding ${PROJECT_ID} \--member serviceAccount:${SERVICE_ACCOUNT}@${PROJECT_ID}.iam.gserviceaccount.com \--role "roles/run.invoker"
To deploy a Cloud Run service using a user-managed service account, you must have permission to impersonate (iam.serviceAccounts.actAs) that service account. This permission can be granted via the roles/iam.serviceAccountUser IAM role.
gcloud iam service-accounts add-iam-policy-binding ${SERVICE_ACCOUNT}@${PROJECT_ID}.iam.gserviceaccount.com \--member "user:<<your_email>>" \--role "roles/iam.serviceAccountUser" --project ${PROJECT_ID}
Step 2: Create a docker image and push to GCR. Navigate to gcs-to-gcs folder and push the image
cd gcs-to-gcsgcloud builds submit -t "gcr.io/${PROJECT_ID}/gsutil-gcs-to-gcs" --project ${PROJECT_ID}
Step 3: Create a job with the GCS_SOURCE and GCS_DESTINATION for gcs-to-gcs bucket. Make sure to give the permission (roles/storage.legacyObjectReader) to the GCS_SOURCE and roles/storage.legacyBucketWriter to GCS_DESTINATION
export GCS_SOURCE=<<Source Bucket>>export GCS_DESTINATION=<<Source Bucket>>gsutil iam ch \serviceAccount:${SERVICE_ACCOUNT}@${PROJECT_ID}.iam.gserviceaccount.com:objectViewer \${GCS_SOURCE}gsutil iam ch \serviceAccount:${SERVICE_ACCOUNT}@${PROJECT_ID}.iam.gserviceaccount.com:legacyBucketWriter \${GCS_DESTINATION}gcloud beta run jobs create gcs-to-gcs \--image gcr.io/${PROJECT_ID}/gsutil-gcs-to-gcs \--set-env-vars GCS_SOURCE=${GCS_SOURCE} \--set-env-vars GCS_DESTINATION=${GCS_DESTINATION} \--max-retries 5 \--service-account ${SERVICE_ACCOUNT}@${PROJECT_ID}.iam.gserviceaccount.com \--region $REGION --project ${PROJECT_ID}
Step 4: Finally, create a schedule to run the job.
gcloud scheduler jobs create http gcs-to-gcs \--location $REGION \--schedule="0 1 * * 0" \ --uri="https://${REGION}-run.googleapis.com/apis/run.googleapis.com/v1/namespaces/${PROJECT_ID}/jobs/gcs-to-gcs:run" \--http-method POST \--oauth-service-account-email ${SERVICE_ACCOUNT}@${PROJECT_ID}.iam.gserviceaccount.com --project ${PROJECT_ID}
Step 5: Create monitoring and alerting to check if the cloud run failed.
Cloud Run is automatically integrated with Cloud Monitoring with no setup or configuration required. This means that metrics of your Cloud Run services are captured automatically when they are running.
You can view metrics either in Cloud Monitoring or in the Cloud Run page in the console. Cloud Monitoring provides more charting and filtering options. Follow these steps to create and view metrics on Cloud Run.
The steps described in the blog present a simplified method to invoke the most commonly used developer-friendly CLI commands on a schedule, in a production setup. The code and example provided above are easy to use and help avoid the need of API level integration to schedule commands like gsutil, gcloud etc.